Reasons That Contribute to Making a Shower Luxurious

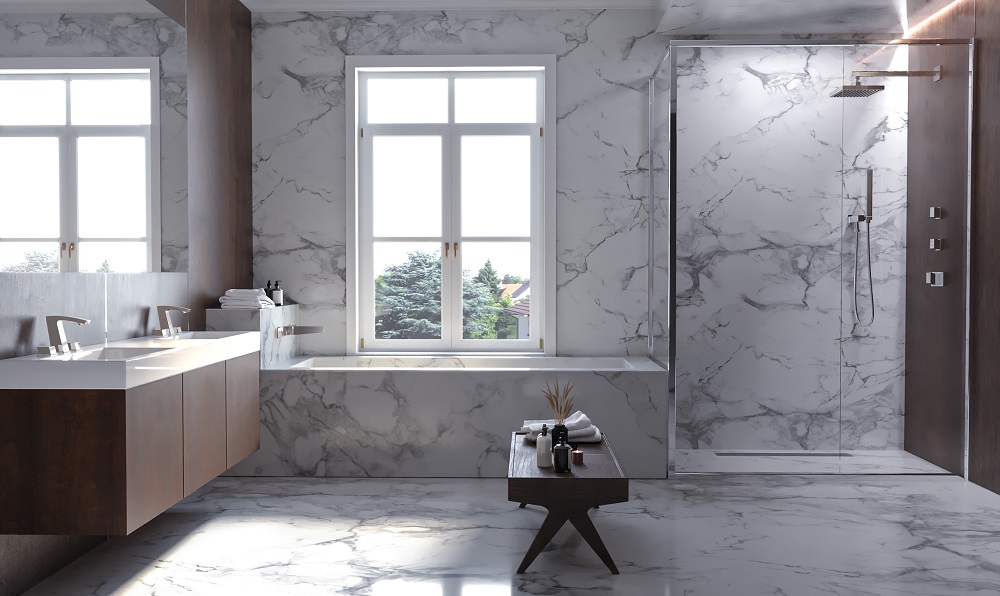
A luxurious shower transcends the ordinary, offering an exquisite blend of opulence and functionality. It goes beyond mere cleansing, transforming into a sanctuary of relaxation and indulgence. High-quality materials, advanced technology, and meticulous design converge to create an experience tailored to individual preferences. From the soothing cascade of a rainfall showerhead to customizable controls for water pressure and temperature, every detail is considered to elevate the bathing ritual. Spacious designs, ambient lighting, and premium tiling materials contribute to the overall sense of luxury shower. Natural stones, sleek glass enclosures, and elegant hardware further enhance the aesthetic appeal, making the luxurious shower a haven of tranquility and style.

High-Quality Materials

In the realm of luxurious showers, the incorporation of high-quality materials stands as a testament to refined taste and uncompromising elegance. Natural stones like marble or granite, known for their timeless beauty, are often selected to adorn these spaces. Their distinctive patterns and textures not only enhance the visual appeal but also infuse a sense of luxury shower. Complementing these stones are high-end ceramics, chosen for their durability and ability to maintain a pristine appearance over time. Polished metals, with their gleaming finishes, add a touch of sophistication, elevating the overall aesthetic of the shower space. Beyond mere aesthetics, the use of premium materials in a luxurious shower contributes to an enduring and opulent ambiance, creating an immersive experience that goes beyond the ordinary.

Innovative Showerheads

At the heart of every luxurious shower is the showerhead, a focal point that transcends mere functionality. Innovative designs redefine the bathing experience, introducing elements that transform routine showers into indulgent rituals. Rainfall showerheads, with their gentle cascade of water mimicking a natural rain shower, evoke a spa-like ambiance. Adjustable settings for water pressure and temperature provide a personalized touch, allowing users to tailor the shower experience to their preferences. The marriage of form and function in these innovative showerheads not only enhances the sensory aspect of bathing but also introduces a visual element, turning the shower into a captivating centerpiece within the luxurious bathroom sanctuary.

Customizable Controls

Luxury showers embrace the concept of tailor-made experiences through customizable controls, offering a heightened level of comfort and convenience. Advanced technology in temperature and water pressure controls allows individuals to craft their ideal shower environment with precision. The ability to personalize the shower experience adds a layer of indulgence to the daily routine. Whether one prefers a warm, gentle shower or a brisk, invigorating cascade, these customizable controls cater to individual preferences, making the shower a personalized haven. The integration of user-friendly technology not only enhances the overall functionality but also contributes to the sense of luxury shower, ensuring that each shower becomes a bespoke experience, perfectly aligned with the user’s desires.

Spacious Designs

Luxurious showers transcend the confines of traditional bathroom spaces, embracing generous designs that foster a sense of opulence and relaxation. Moving away from cramped quarters, these showers become open, inviting retreats within the home. The additional space not only contributes to a feeling of grandeur but also allows for the integration of supplementary features, such as built-in seating or shelving. A spacious shower area provides a canvas for creative design, enabling the inclusion of elements that enhance the overall functionality and aesthetic appeal. This newfound freedom within the shower space transforms the daily ritual into an experience of freedom and tranquility, where one can escape into a personal oasis of luxury and comfort.

Ambient Lighting

In the luxurious shower experience, lighting takes on a crucial role, acting as an atmospheric enhancer that transcends mere illumination. Soft, ambient lighting becomes a design element that transforms the mood of the shower space, creating a soothing and tranquil environment. The careful placement of lighting fixtures, such as strategically positioned LED lights, adds a visual dimension to the shower experience. Beyond the practical aspect, ambient lighting becomes an integral part of the overall aesthetic, contributing to the luxurious ambiance. It turns the act of bathing into a sensory experience where light and water converge, creating a harmonious atmosphere that is not only visually pleasing but also emotionally captivating, making the shower an immersive retreat.

Premium Tiling and Finishes

The choice of tiles and finishes in a luxurious shower is a meticulous process, where every detail contributes to the overall opulence and sophistication. High-quality tiles, whether crafted from natural stones like marble or custom-designed ceramics, serve as a canvas for artistic expression. These tiles not only add a touch of extravagance but also bring a sense of coherence to the design. Thoughtfully selected finishes, such as polished chrome or brushed nickel for hardware, elevate the entire aesthetic, creating a cohesive and refined look. The synergy between premium tiling and finishes is a key aspect of luxurious showers, where every step is carefully curated to ensure that the visual allure aligns with the user’s desire for a space that exudes sophistication and style.

Smart Technology Integration

In the contemporary era, the integration of smart technology has become a defining feature of modern luxury showers. This goes beyond mere convenience, offering a seamless fusion of technology with the daily bathing ritual. Digital controls for water temperature and pressure provide a level of precision that caters to individual preferences. Bluetooth-enabled sound systems bring music into the shower space, allowing users to create a personalized environment. The ability to synchronize lighting and control various elements through smart devices adds a high-tech dimension to the luxurious shower experience. This integration not only enhances the functionality but also positions the shower as a space where technology and luxury converge, creating a cutting-edge yet indulgent retreat within the home.

Elegant Enclosures and Hardware

The design of shower enclosures and the choice of hardware play a pivotal role in shaping the overall elegance of a luxurious shower. Sleek glass enclosures, with their transparent surfaces, not only create a sense of openness but also serve as a canvas to showcase the interior design. The choice of high-quality hardware, such as designer faucets and handles, adds a refined touch that completes the luxurious look and feel of the shower space. These elements contribute to a sense of cohesiveness within the design, ensuring that every detail aligns with the overarching theme of luxury shower. The combination of elegant enclosures and carefully selected hardware transforms the shower into a sanctuary of sophistication, where every visual element harmonizes to create an environment that is both visually stunning and functionally exceptional.

Conclusion

A luxurious shower is a holistic experience that goes beyond mere functionality. It encompasses a careful selection of materials, innovative features, and thoughtful design elements to create a space that is both visually stunning and immensely comfortable. As we explore these eight reasons, it becomes clear that the luxurious shower is a fusion of quality craftsmanship, advanced technology, and an understanding of the user’s desire for a spa-like retreat within the confines of their own bathroom. Reach out to a specialist to customize your bathroom.


Laundry Room Essentials: Your Washer and Dryer Buying Guide

The laundry room is often an overlooked but essential space in our homes. It’s where the magic happens – the transformation of dirty clothes into fresh, clean ones. Whether you’re a seasoned homeowner looking to upgrade or a first-time buyer setting up your laundry room, selecting the right washer and dryer is crucial. In this comprehensive guide, we’ll explore everything you need to know to make an informed decision when buying a washer and dryer.

Assessing Your Laundry Room

Before diving into the world of washer and dryer options, let’s begin by understanding your laundry room’s space and requirements. Here are a few key factors to consider:

  • Room Size: Measure your laundry room to determine how much space is available for your appliances. This will help you decide on the size and type of washer and dryer that will fit comfortably.
  • Utility Connections: Check if your laundry room has the necessary utility connections, including water supply, drainage, and electricity. If not, you might need to budget for installation or choose ventless models.
  • Ventilation: Adequate ventilation is crucial to prevent moisture buildup and mold. Ensure your laundry room has proper ventilation options.

Types of Washers and Dryers

There are several types of washers and dryers available, each with its unique features and benefits. Let’s explore the most common options:

Washer Types:

  • Top-Load Washers: These are the traditional washers with a lid on top. They’re easy to load and are available in both agitator and high-efficiency models.
  • Front-Load Washers: Front-load washers are known for their efficiency and larger capacity. They use less water and have various wash cycle options.
  • Stackable Washers: Perfect for small laundry rooms, stackable washers save space by stacking the dryer on top of the washer.
  • Compact Washers: Ideal for tight spaces or apartments, compact washers are smaller in size but still pack a punch in terms of performance.

Dryer Types:

  • Electric Dryers: These dryers use electricity to generate heat and require a 240-volt power outlet. They are commonly found in most homes.
  • Gas Dryers: Gas dryers are more energy-efficient and cost-effective in the long run, but they require a natural gas connection.
  • Ventless/Condenser Dryers: Ventless dryers do not require an external vent for moisture removal, making them suitable for apartments and spaces with limited ventilation.

Features to Consider

When choosing your washer and dryer, several features can enhance the functionality and convenience of your laundry routine:

  • Capacity: Consider the size of your household and the amount of laundry you do. A larger family may require a washer and dryer with a higher capacity.
  • Energy Efficiency: Look for appliances with an ENERGY STAR certification to ensure they are energy-efficient, which can save you money in the long term.
  • Wash and Dry Cycles: The variety of wash and dry cycles can make your life easier. From delicate to heavy-duty cycles, having options ensures you can care for all your laundry needs.
  • Noise Level: Some washers and dryers can be noisy, so if your laundry room is close to living spaces, opt for quieter models.
  • Smart Features: Modern appliances often come with smart features, such as remote control and monitoring through smartphone apps, saving you time and effort.
  • Warranty: Ensure your appliances come with a warranty for peace of mind and protection against unexpected repairs.

Maintenance and Care

Maintenance and care are crucial aspects of ensuring the longevity, efficiency, and safety of your washer and dryer. Regularly attending to these tasks can prevent malfunctions, reduce the risk of breakdowns, and contribute to the overall performance of your laundry appliances. Let’s delve deeper into the maintenance and care practices for both washers and dryers:

Washer Maintenance and Care:

  • Clean the Lint Filter: Many modern washers come with a lint filter that should be cleaned after each use. This filter captures lint and debris from your clothes, preventing them from clogging the drain and causing drainage problems.
  • Inspect Hoses and Connections: Regularly check the water inlet and drain hoses for any signs of wear, cracks, or leaks. Ensure that all connections are tight and secure to prevent water leakage.
  • Use the Right Detergent: Different types of washers, especially high-efficiency models, may require specific detergents. Using the wrong detergent can create excessive suds and lead to poor cleaning or even damage the machine. Follow the manufacturer’s guidelines for the appropriate detergent.
  • Leave the Door Open: After each wash cycle, leave the washer door slightly ajar to allow air to circulate and prevent the growth of mold, mildew, and unpleasant odors.
  • Clean the Dispenser Drawers: If your washer has a detergent or fabric softener dispenser drawer, remove it and clean it regularly to prevent detergent residue buildup.
  • Inspect and Clean the Drum: Periodically check the drum for any foreign objects, like loose change or buttons, that might be causing damage. You can also run an empty hot water cycle with vinegar or a washer cleaner to remove any mineral buildup.

Dryer Maintenance and Care:

  • Clean the Lint Trap: Before or after every drying cycle, clean the lint trap or lint screen. A clogged lint screen can restrict airflow, reduce drying efficiency, and pose a fire hazard.
  • Inspect and Clean the Vent and Duct: Regularly check the dryer’s exhaust vent and duct for lint buildup. Accumulated lint is highly flammable and can lead to fires. Ensure that the vent is unobstructed, and clean it annually, at the very least.
  • Check for Unusual Noises and Vibrations: Pay attention to any strange sounds or excessive vibrations during operation. These could be early warning signs of a problem with the dryer’s motor, blower, or other components.
  • Regularly Replace the Dryer Belt: The dryer belt is responsible for rotating the drum. If it starts to wear or break, it can result in inefficient drying. Replace it if you notice any signs of wear or if the drum is not turning properly.
  • Keep the Area Around the Dryer Clear: Ensure there is sufficient space around the dryer for proper ventilation. Remove any items or debris that might obstruct airflow or create a fire hazard.
  • Inspect the Gas Line (Gas Dryers): If you have a gas dryer, inspect the gas line for leaks or damage. Gas leaks are dangerous and should be addressed immediately by a professional.

In addition to these maintenance and care practices, it’s a good idea to consult your washer and dryer’s user manual for manufacturer-specific guidelines. Following the recommended maintenance schedule and best practices will not only extend the lifespan of your appliances but also help them operate at peak performance, saving you energy and money in the long run. Regular maintenance also contributes to the safety of your laundry room, as it reduces the risk of fire hazards associated with lint buildup and gas leaks (in the case of gas dryers).

Installation and Setup

Proper installation is crucial for the safety and functionality of your washer and dryer. If you’re not experienced with such installations, it’s advisable to hire a professional. Here’s what you should consider:

  • Location: Choose a level, stable, and well-ventilated location for your appliances.
  • Utility Connections: Ensure water supply, drainage, electrical, and gas connections are correctly installed and meet local building codes.
  • Ventilation: Properly vent your dryer to the outside to prevent moisture buildup and potential fire hazards.
  • Stacking: If you have a stackable set, follow the manufacturer’s instructions for secure stacking.

Making the Final Decision

After assessing your laundry room, understanding the types of washers and dryers available, considering essential features, setting a budget, and knowing how to maintain your appliances, you’re now ready to make the final decision.

  • Research: Read reviews, ask for recommendations, and visit showrooms to see the appliances in action.
  • Compare: Create a list of your top choices and compare them based on capacity, features, and budget.
  • Check Dimensions: Double-check the dimensions to ensure the appliances will fit in your laundry room.
  • Retailer and Warranty: Choose a reputable retailer and inquire about the warranty terms.
  • Delivery and Installation: Discuss delivery and installation options, and make sure they can accommodate your schedule.

Final Thought

Selecting the right washer and dryer for your laundry room can significantly impact your daily life. By assessing your laundry room, understanding the different types and features, and following the budget and maintenance guidelines, you can make an informed decision that suits your needs and enhances the efficiency of your laundry routine. Now, go ahead, make your choice, and enjoy fresh, clean clothes with ease!

If you’re considering a new washer and dryer, you can explore your options with this online collection, or for further help or guidance, speak to a home appliance expert.

Your Guide to Washing Machine Detergent

In the past, using laundry detergent was fairly simple, use the cap measurement cup and guestimate how much you needed for a particular load. Today, things are a little more complicated. With high efficiency laundry machines and detergents of varying strengths, understanding the amount of detergent you need is a little more complicated. So, here we’ll explore the topic in greater detail.

The Different Types of Laundry Detergents:

There are a few different types of detergent that are safe to use in your washing machine. These include:

  • Liquid: This is the most common form of laundry detergent, which can be helpful in removing dirt and grease from your clothing. While liquid can be a little messy, it does quickly dissolve in water. But, you need to be careful not to use too much or you could end up with an awful lot of suds.
  • Powder: This is a good money saving option as powders tend to be cheaper compared to liquid detergent. But, they still offer efficient cleaning. The main disadvantage of powder is that it does not dissolve as easily in water. If you use too much powder, you may find you have powdery marks remaining on your clothing.
  • Tablets and Pods: Tablets and pods are premeasured, so you can simply add one to your washing machine. This makes them extremely convenient, but they are more costly. Additionally, there is a safety hazard, as small children or animals could be injured if they ingest a pod.
  • HE Products: HE detergents are designed specifically for high efficiency machines. They are available in liquid, powder and pods. Since HE appliances do not use as much water as conventional machines, the detergent is designed for an efficient wash. Although you use less detergent per load, HE detergent is typically more expensive compared to non HE products.
  • Laundry Soap: This is the most basic form of laundry detergent, but it can be used in washing machines. It may take the form of soap bars or flakes, but you may choose to use laundry soap as a base to make your own laundry detergent.

How Much Detergent Should You Use?

Choosing the right laundry detergent can have a massive impact on the efficiency and effectiveness of your washing load, but the performance of even the best product can be compromised by using the wrong amount.

All laundry detergent products will contain a guide of the recommended amount you should use. This will be broken down by three factors:

  • The load size: The first thing you’ll need to assess is the load size. Ideally, you will only use your washing machine with a full load to maximize the energy and water efficiency. But, if you do need to do a half load, you will need to adjust the detergent accordingly.
  • The soil level: This is a judgment call, but you will need to evaluate whether your items are lightly, normal or heavy soiled. If the load is lightly worn, delicate items, you should consider this lightly soiled. On the other hand, if your children have been playing in the mud, you’ve been doing some heavy household chores or working in the garden, the chances are that your load is heavily soiled.
  • Your water hardness: The final factor in the calculation for how much detergent to use is your water hardness level. Hard water inhibits soap’s ability to sud up, so you may need to use slightly more.

If your washing machine is failing to deliver the best results, regardless of your detergent, it may be time to consider an upgrade. You can explore your options with our online laundry collection or speak to one of our home appliance specialists for further help.

DIY Maintenance Tips for Your Home Appliances

We rely on our home appliances to make our lives more enjoyable and convenient. While it is a good idea to have a professional service your appliances regularly, there are some DIY maintenance tips to keep your appliances in good shape.

Dishwasher Maintenance Tips

It is not overly difficult to ensure your dishwasher keeps running, but it does require a little care and attention.

Run it Regularly:

The first thing you should do is to ensure that you run your dishwasher regularly. Allowing it to sit for days on end can allow food and other build up to settle and become more difficult to clear later. You should also run a cleaning cycle regularly. You can add a cup or two of vinegar into the dishwasher and run a low cycle to clean and freshen the interior of the machine. Don’t worry about the vinegar smell as it will dissipate if you leave the door open for a few minutes at the end of the cycle.

Clean the Arms:

Another simple task that can keep your dishwasher running properly is to clean the spinning arms under the racks. Food and other debris can get caught up in the arms and compromise performance. If the arm holes become completely blocked, it could also increase the water pressure in the arm, putting it at risk of damage. If you see any debris in the holes, use your fingers or a small item, such as a needle to poke it out. Just take care not to use something that may break off and cause a further obstruction.

Washer Maintenance Tips

Washers tend to have a fairly long lifespan, but if you want to keep your whites bright, there are some simple things you can do.

Measure Your Detergent:

Many of us eyeball the amount of detergent we put into a laundry load, but this can be a bad idea. Modern washers are energy and water efficient, so if you use too much detergent, it can cause excessive suds that can create problems. This is particularly important if you have a High Efficiency machine which requires a detergent that produces less suds.

Don’t Allow Laundry to Sit:

When you’re busy, it can be very easy to put on a laundry load and then forget about it. Unfortunately, allowing wet laundry to sit inside the washer can encourage mold and mildew to develop. Not only will this leave your laundry smelling less than fresh, but it can also create problems inside your washer. It is also a good idea to leave the door of your washer ajar after each load to allow the machine to properly air.

Clean Your Washer:

Just like with your dishwasher, you can expect to get clean clothes out of your washer if the machine is dirty. So, periodically give the gasket, drum, door and dispensers a clean. Wipe down with a damp cloth with a mild detergent or water and vinegar solution. You should also run a hot cycle on empty using either vinegar or detergent every month to help keep the interior clean.

Dryer Maintenance

Dryers can have a tough life, but improper maintenance can make them work even harder. So, it is important to perform DIY maintenance tasks regularly between servicing.

Ensure Proper Ventilation:

All dryers are designed to vent, but the white plastic tubing that is often supplied can be prone to cracking or melting. So, it is a good idea to replace this cheap tubing with proper aluminum vent tubes.

Clear the Lint:

After every cycle you should clear the lint trap, but you should also make sure that there is no lint around the vent and vent cap. This will not only ensure that your laundry dries more quickly, but also reduce the risk of fire. If you do notice that your drying cycle is taking longer than usual, be sure to check for lint you may have missed.

If your appliances are struggling to perform correctly, it may be time for an upgrade. You can explore your options with our online collection or speak to one of our home appliance specialists.

Tips for Easier Cleaning of Your Oven Door

When your oven is brand new, that beautiful glass door is a window into the delicious meals and dishes you’re preparing. Unfortunately, over time grime can become trapped between the layers of glass and it can start to give your oven a grubby look. Fortunately, you don’t need to be a cleaning professional to restore the appearance of your oven door.

Figure Out How to Open the Oven Door

The first thing you need to do is refer to your owner’s manual and learn how to open the door to clean the interior pieces of glass. It is next to impossible to clean the glass properly without being able to open the door, so take a little time to work out how to do this with your oven model.

Typically, the process is quite straightforward and will involve opening the oven door and taking out the screws that are either on the top or inside face of the oven. Just be sure to support the oven door before you take out the screws as you don’t want it crashing to the floor.

Check for Quick Release Panels

Some oven models feature a hinge lock that allows you to press it in and release the glass panels. You’ll need to open the oven door and check for a cover that runs along the top of the oven door. If the model has an easy open hinge lock, just press in the sides and pull it back. You can then remove the glass and clean it without needing to lift and move a potentially heavy oven door.

Use Castile Soap and Water

You don’t need expensive chemical cleaners to get a sparkling glass oven door. This is the reason why many people are hesitant to give their oven a good clean, as they are worried about caustic burns or fumes. Fortunately, you don’t actually need such harsh chemicals as you can get great results with a little Castile soap and water. This will help to clear away any greasy residue and dirt. You can use a soft cloth or sponge to scrub the glass without concerns about scratching the glass surface.

Use Vinegar and Water For Shine

Once you have cleaned the glass, you don’t want any soapy residue compromising the finished look of your oven door. So, use a white vinegar and water solution to remove any soapy residue and provide a shiny, clear finish. Don’t worry about the vinegar smell; it will smell strongly initially, but this odor will quickly dissipate.

Polish With a Soft Cloth

When you’re done cleaning, allow the doors to air dry separately to clear any moisture. Once they appear dry, go over the panes of glass with a soft cloth to polish away any water spots.  

Consider an Upgrade

Of course, if your oven is getting on in years and is starting to have issues, no amount of cleaning will restore its functionality. The typical lifespan of an oven is less than twenty years, so if your oven is approaching this age and you’ve noticed that you need to call out a repair technician more frequently or you’re having difficulties getting great results when you bake a cake or make a roast, it is a sign that your oven is reaching the end of its useful lifespan.

In these cases, you may need to consider an oven upgrade. You can then access the latest features, including easier to clean doors along with improved energy efficiency.

If you’re considering an oven upgrade, you can explore your options with our online oven collection or speak to one of our home appliance experts for specialist help and guidance.

What is the Future for Kitchens in the Covid Era?

There is no way to avoid the fact that Covid-19 and its variants have had a huge effect on many aspects of our lives during the past 12-18 months. Some changes have been more immediate and obvious than others and we have had to adjust how we approach tasks, use space, and more. In many homes, the kitchen is firmly at the heart of things, this is where we cook, eat and socialize and this space can provide some insights into our lives. In this article, we will take a closer look at how kitchens have changed in 2021 and what we can expect as this Covid era continues for the foreseeable future.

Choosing Smarter Kitchen Appliances

Even before the Covid-19 pandemic arrived on the scene, we were seeing a movement towards the increased use of smart technology in many areas of our homes. Of course, this also includes the kitchen and smart appliances are becoming a popular option. Some common applications of smart kitchen technology include toasting, steaming, frying, baking, air fryers, microwave ovens, and more. Smart appliances have touch screens for easier control or you can use a dedicated app in certain circumstances. If you’re forced to work from home, it can be hard to get the work/life balance right and smart technology can take some of the strain during this difficult period.

Adopting Smart Shopping and Storage Strategies

When times are hard people tend to tighten their purse strings and adopt budgeting strategies to make their household budget stretch further. One of the areas where a lot of savings can be made is the food budget and food waste is a real problem. If you use smart shopping options and smart storage to track your food needs, consumption and ordering, you will notice that food waste is reduced significantly. Color coding your pantry, making extra space, and even adding a second freezer or refrigerator can help. If you want to store more food for longer, learning how to can foods or starting a dry food pantry can really make a difference. When you have ample supplies of flour, you can make regular use of your oven or bread maker to ensure you always have fresh bread.

Kitchen Remodeling on a Budget

When the purse strings are tightened, it’s easy to think that every project must go on hold indefinitely. But, it is possible to make smaller changes with a DIY ethos and improve your home in many ways without spending large amounts of money. This is equally true in the kitchen, you may not be able to swing new cabinets, but a lick of paint can give you a fresh new look. Skimping on a much needed appliance upgrade doesn’t make much sense when you can get better performance and improved energy efficiency. Shop for greener appliances with an Energy Star rating and make energy efficiency your focus for the next few years.

Entertaining at Home

As people are shying away from going out, it seems like a natural trend towards entertaining at home is underway. The Covid era may include dinner parties for family and close friends in an intimate setting at home. This may explain the increase that we’ve seen in bolder kitchens with designated areas for home dining. Open shelving, breakfast nooks, kitchen islands, elaborate cooker hoods, and more have become popular items in recent months. When you entertain at home, you may need to consider an upgrade to your existing kitchen appliances with a focus on energy efficiency improvements.

If you want to upgrade your kitchen appliances, explore our collection online or speak to one of our appliance specialists for expert advice and guidance.

How to Maintain Energy Efficiency with Kids

Let’s face it, when you have smaller children in your home, it can be a challenge to maintain and improve your energy efficiency. But, this doesn’t have to be the case, it is possible to teach kids about making energy savings and they will enjoy being part of the solution. When a family works together on any project it can be rewarding and this can apply to running your home appliances efficiently. In this article, we will look at four strategies that will encourage your kids to think about energy efficiency.

1.  Adopt a Monthly Reward System

The reward system can work well for a wide variety of activities and this applies to energy efficiency too. Providing positive reinforcement for good behavior can help to protect your appliances and improve your energy efficiency. For the best results, customize the rewards and make them appropriate for your child’s age and interests. Show your kids the energy bill for the same month last year and offer half that amount in rewards if the energy bill is lower this year. Track the progress of the bills over the year and see how often the family can get those extra rewards. This is a great way to build a sense of responsibility and a real world way to use math skills too.

2.  Reducing Standby Times

One of the lesser understood aspects of a home energy bill is the energy that’s wasted on standby mode. An appliance that is powered when it’s not even in use can use a lot of power over the course of an entire year. The only way to prevent this is to turn off and unplug appliances that are not in use. Of course, there are certain appliances such as refrigerators and freezers that must be kept on at all times. But, you can easily turn off the coffee machine, toaster oven, computers and other devices. It’s easy to make this activity into a game, sharp eyed kids will be happy to turn off designated devices to help out the family and earn a reward.

3.  Changing Filters

This is probably a task better suited to older kids and teens, but if you change your filters regularly, it can improve energy efficiency dramatically. The most obvious example would the air conditioner filter, which should be replaced every 4-6 weeks during the summer months. More frequent changes may be required if you have pets living in the home. Maintaining airflow is crucial for these appliances and filter clogs can overwork heating and cooling equipment. The full instructions for filter changes are in the owner’s manual and your child can follow a reminder that you set up on their phone. This is a great way to demonstrate trust and build a sense of responsibility in your kids.

4.  Defrosting the Freezer and Refrigerator

When the freezer and/or refrigerator is overflowing with ice it can be a considerable energy drain for your home. In fact, the more ice you have the more energy it will consume and it can be hard to maintain the temperature at a consistent level. Defrosting on a regular basis is important, start by scraping the ice manually with a special scraper or use a steam cleaner instead. Your kids should have some old towels on hand for mopping duties and defrosting as a family team makes the process even easier.

One of the best ways to improve your energy efficiency at home is to invest in high-efficiency appliances. If you’re considering an upgrade, explore our appliances or speak to one of our appliance specialists for expert advice and guidance.

How Does the Refrigeration Cycle Work?

Most of us don’t pay much attention to how our appliances work until they fail, and it’s time to replace them. A refrigerator is a hard working kitchen appliance that we rely on to keep our food at the optimal storage temperature. During the last year, it has become evident that we need to have ample stores of fresh food on hand to deal with emergency situations. In this article, we will take a closer look at refrigerators, examining how they work and the vital components that make it all happen.

How Does a Refrigerator Work?

A refrigerator prolongs the lifespan of perishable foods by storing them at the optimal temperature. This process slows down the bacterial growth in all foods to significantly extend the shelf life and ensure it’s safe to eat. The exact process is known as the refrigeration cycle, and it works by transferring heat from inside the refrigerator to the outside. This heat transference is key. It’s important to understand that the contents of the appliance are not cooled; rather the heat is removed to make the food cooler. This is achieved with condensation and evaporation, and we will cover this process in more detail later.

We have become accustomed to refrigerating and freezing foods to preserve the food we bring into our homes. Without refrigeration, milk will spoil in less than three hours due to the growth of harmful bacteria. The process of spoiling is slowed by refrigeration, but if you froze the milk in your freezer, the growth of bacteria would be stopped entirely. In fact, if you did freeze your milk, it could last for month, but sooner or later, freezer burn would affect the quality.

The Refrigeration Cycle Explained

As the name may suggest, the refrigeration cycle is a self contained system that continues to work as long as power is supplied to the appliance. The process is cyclical in nature, it follows nine key stages, and then the process is repeated.

  1. The refrigerator thermostat sensor senses the temperature set inside the appliance, and the compressor is automatically engaged to remove heat.
  2. The compressor draws liquid refrigerant present in the system into the refrigerator; it’s then pressurized and condensed, which turns it into gas.
  3. This raises the temperature of the refrigerant.
  4. The refrigerant gas is then pushed onto the condenser coils located on the rear of the refrigerator.
  5. The air in this location has a lower temperature than the gas, so it is quickly cooled back into a liquid state.
  6. As the cooling occurs, the heat in the refrigerant is dissipated.
  7. The cool refrigerant is then sent to an evaporator and distributed to the inner coils of the refrigerator and/or freezer.
  8. The refrigerant then absorbs the hotter air inside the appliance, and in turn, this lowers the temperature.
  9. The refrigerant then returns to a gaseous form, it goes back to the compressor, and the entire refrigeration cycle begins again.

5 Key Refrigerator Components

There are five main refrigerator components. They are compressor, evaporator, condenser, thermostat, and expansion valve:

  1. The Compressor: The compressor unit circulates the refrigerant in the system, and it acts as a motor and a pump at the same time.
  1. The Evaporator: The evaporator can be found in the refrigerator. Its function is to absorb any heat in the appliance to reduce the temperature.
  1. The Condenser: This is the system of pipes and fins that you can find at the rear of your refrigerator. This unit releases the heat that has been absorbed from inside the appliance, and this is why it may feel warmer than room temperature.
  1. The Thermostat: This is the brain of the entire system. It controls the temperature inside the refrigerator automatically and activates the refrigeration cycle as required.
  1. The Expansion Valve: The warm refrigerant from inside the refrigerator travels through tubing, which acts as an expansion device when it cools back down from a gas to a liquid.

If your refrigerator is struggling to keep your food cool, it may be time for an upgrade. You can explore your options with our online refrigerator collection or speak to one of our home appliance specialists for further help.

Tips for Saving Energy On Your Appliances During Winter

When winter arrives, many homeowners have concerns about their utility bills. Since you’re likely to spend more on heating your home, you may want to make savings elsewhere. So, here we have some tips for saving energy on your appliances during winter.

Refrigerator:

The simplest way to waste energy is to keep opening and closing your refrigerator door. Each time you open the door, cold air can escape, and your appliance will need to work a little harder to compensate for this.

The ideal solution for this is to have a glass door refrigerator or smart fridge with an interior camera. However, if this is not feasible, try to limit how often you open the door. Try to avoid browsing the contents with the door open. Instead, have a clear idea of what you need before you open the door.

Oven Range:

Rather than heating your entire oven to reheat any leftovers, use a microwave or toaster oven. These smaller countertop appliances use less energy than a conventional gas or electric range.

Additionally, if you’re cooking in the oven, look through the door to check on the progress of your dish. Use the oven light rather than opening the door. The internal temperature can drop by 25º each time that you open the door.

Washer:

While it may be tempting to just run a wash cycle with only a few items, this wastes water and energy. So, you should only wash full laundry loads. You can also save as much as $60 each year by washing your laundry in cold water. Although some laundry detergents are designed to work best with warm water, most modern products can perform just as well in cooler temperatures. Additionally, washing winter knits in cold temperatures can cause less fraying. So, your clothing will last longer.

Dryer:

In addition to saving energy, you can reduce the risk of a fire by cleaning the lint filter on your dryer regularly. It is also a good idea to check the tubing to ensure there isn’t an accumulation of lint. Run your vacuum cleaner nozzle down the tubing to clean out any stubborn particles.

If you want to save additional energy, try to air dry where possible. Use drying racks if you can’t hang your laundry outdoors due to adverse weather conditions.

Dishwasher:

Like your washer, you should only run your dishwasher if you have a full load. Many dishwasher models may feature a light load function, but this often still uses more water when compared to washing a similar number of dishes on a full load.

Another way to save water and energy is to avoid using “rinse hold” during the cycle. This feature can use as much as seven times more hot water per use. Additionally, avoid using a rinse precycle. This not only uses more water, but it can also compromise the detergent performance. Most modern detergents are designed to work with particles of food debris. So simply scrape your dishes before loading.

Finally, consider air drying your clean dishes rather than using a drying cycle. This can reduce the energy use of your dishwasher by 15 to 50 percent.

Watch Out For Energy Spikes:

While it is inevitable for your energy bills to increase over winter, be aware of any spikes in usage. These may indicate that one of your appliances is no longer operating efficiently. As appliances age, they need to work harder to perform correctly. This increases energy use. So, if your energy bills have increased more than expected and one of your kitchen appliances is getting to the end of its lifespan, it may be time for an upgrade.

If your kitchen appliances can no longer handle the demands of your household, you can explore your options with our online kitchen appliance collection. Alternatively, speak to one of our home appliance specialists for expert help and guidance.

Is That Food Safe? Your Guide to Shelf Life

Most of us have experienced the scenario where we open up the refrigerator to find something moldy looking back at us. These items are often lingering at the back of the refrigerator. Still, even when it is full view, it can be difficult to determine the optimum food shelf life inside your refrigerator. Here we’ll explore a few basic food storage standards to save you from upset stomachs and wasting money on spoiled foods.

Basic Food Safety Tips

Before we delve into the optimum shelf lifespans for all the items inside your refrigerator, there are some basic safety tips to help preserve your foods.

  • Avoid Crowding: To keep your foods properly chilled and at the correct temperature, cold air must be able to circulate around the items. While keeping your refrigerator full is more energy efficient, you should avoid crowding or overpacking.
  • Immediately Wipe Up Spills: Wiping spills quickly will not only help to avoid bacterial growth, but it will also help to prevent cross contamination. Many spills are often drips from thawing meats or other raw foods that can easily contaminate cooked dishes that will only be reheated.
  • Keep Everything Covered: All foods inside your refrigerator should be in sealed storage bags or in covered containers. Of course, this doesn’t mean that you can forget about everything, so be sure to check leftovers each day for signs of spoilage.
  • Monitor Food Expiration Dates: If any item has passed its “use by” or “best before” date, it is a good idea to discard it. If food looks questionable, it is best to err on the side of caution and throw it out.
  • Put Groceries Away Within the Hour: When you return from the grocery store, you should act quickly to ensure all your refrigerated items are properly stored. If the temperature is above 90ºf, there is a one hour limit before foods can spoil.
  • Refrigerate Leftovers Within Two Hours: There is a common misconception that you shouldn’t put hot food in the refrigerator. Unfortunately, allowing food to sit on the countertop for hours can encourage bacteria. If you have any leftovers, they should be refrigerated or possibly frozen within two hours. If you’re concerned about hot food, divide leftovers into smaller portions, so they can cool more quickly.

Shelf Life Guidelines

Most foods can be divided into groups, which can help you to determine the optimum shelf life.

Miscellaneous:

  • Opened condiments: Up to 6 months
  • Tuna: 2 to 4 days

Dairy:

You’ll need to use your sense of smell. Dairy items tend to develop a bad smell when they go bad, so anything that has a bad smell should go straight into the garbage.

  • Milk: Up to 7 days
  • Soft Cheese: Up to 7 days
  • Eggs: 3 weeks
  • Yoghurt: 7 to 14 days

Fruits:

Fruits can go soft and mushy when they start to go bad, but you may notice some items start to go black.

  • Bananas: 2 days
  • Melons: 1 week
  • Avocados: Up to 10 days

Vegetables:

Like fruits, vegetables can start to go mushy or change color.

  • Fresh lettuce: Up to 5 days
  • Tomatoes: Up to 1 week
  • Cucumber: 1 week
  • Onions: 2 months

Leftovers:

Leftovers tend to be pushed to the back of your refrigerator, so you need to ensure you keep a good eye on what is lingering there.

  • Meat Leftovers: Up to 4 days
  • Pizza: 3 to 4 days
  • Gravy: 1 to 2 days

Meats:

In addition to developing a bad odor, the most obvious sign of bad meat is changing color.

  • Chicken: Up to 2 days
  • Steak: Up to 5 days
  • Fresh Hamburger: Up to 2 days
  • Pork Chops: 3 to 5 days
  • Fresh Fish: Up to 2 days
  • Bacon: Up to 7 days
  • Fresh Sausage: Up to 2 days
  • Lunchmeats: Open- 3 to 5 days, unopened up to 2 weeks

If your refrigerator is struggling to keep your produce fresh, it may be time for an upgrade. You can explore your options with our online collection or speak to a home appliance expert for further help and guidance.